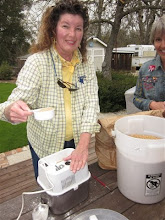
We Made Yogurt!

1 1/2 Gallon Milk
2-3 Tbsp. plain yogurt (starter)

1 8-10 Qt. Stockpot
1 4-5 Qt. Pot with Lid
Spoon
Dial Thermometer with clip
Heating Pad (optional)

Sterilize equipment.

Fill larger pot with water and begin bringing to a boil. Add milk to smaller pot and carefully place into larger pot adjusting height of water keeping milk and water the same. Clip your thermometer to the rim of the pot.

Bring milk to 185 degrees. If you have no thermometer.... this is the temperature the milk will begin to froth as in a latte.

While waiting for milk to warm you can fill your sink with water and ice to speed up cool down. When temperature reaches 185 degrees remove from heat and place pot in cold water.

Cool to 110 degrees. This is the temperature at which yogurt cultures reproduce themselves. (Be sure ice water level is the same as the milk level stirring occasionally)

Pitch your yogurt simply means to add... which comes from the brewing world. You pitch yogurt to make more yogurt!

Pour 2 - 3 Tablespoons of your starter yogurt (Dannon is a good one) if this is your first batch. You could also purchase a dried yogurt starter if you so choose. After that you will always save a portion of your yogurt as your starter for the next batch.

Stir gently, put the lid on and cover with warm towels. Set in a warm place undisturbed (heating pad works great) for 7 hours.
Set heating pad to medium and place on cutting board. You could also try on top of your refrigerator... or even in a small styrofoam ice chest.

Place in refrigerator until set and cold!

It's A Miracle!

It's A Miracle!

Homemade Yogurt topped with...

Homemade Yogurt topped with...
Homemade Granola!

Drying Calendula : Pick blossoms in the afternoon when blossoms are dried and newly opened. If you don't have a dehydrator blossoms can be dried on cookie sheet in a warm oven at 200 degrees until crisp. Remove petals from stem and place in a clean glass jar.

Calendula Infused Oil: Place one cup of blossoms in a quart jar covering with olive or jojoba oil. Place in brown bag and put on windowsill in sunshine for two weeks shaking several times a day.

Strain the blossoms reserving the oil. Refill the jar with more dried blossoms adding more oil if needed to cover. Place jar back in bag and back on windowsill for two more weeks shaking several times a day.

Strain into a dark glass jar. Stir in 800 IU Vitamen E or 2 400 capsules (poked with a pin and squeezed into mixture). This enhances it's keeping qualities.

Add essential oils to scent if desired. Store in dark cool place.


Thursday, April 26, 2012

Farmgirls Love Hyper Tuffa...


 Supplies: various containers. (plastic and cardboard are the easiest.) Peat Moss, Perlite, Portland Cement Mold Release Spray (find it in the candle-making section of craft stores) 

 
1. Choose mold: Make a mold from two nested vessels, so you can pour the mixture in the space between them. Both should have sides that are straight or taper out; the gap between them should be at least 3/4 inch for smaller vessels and 1 1/2 inches for larger ones. 

2. Mix: Wearing gloves and a dust mask, mix equal parts white Portland cement (gray can be substituted for nontinted vessels), perlite, and peat moss in a large bin; stir in masonry stain if desired. Add water gradually to reach the desired consistency. 

3. Fill mold: Coat vessels with mold-release spray. Pour mixture into the outer mold to a 1-inch depth for smaller vessels or a 2-inch depth for larger ones. Set interior mold inside, centering it (you can fill it with sand to steady it). Continue adding mixture between vessels. Tap exterior with a rubber mallet to minimize bubbles. Cover with plastic; let set. 

4. Finish hypertufa: Let set for 24 hours, then gently remove interior container. After removing mold, drill holes into the bottom of pot using a masonry bit, for drainage; smooth the top edge of pot with a planer file. After another 24 hours, tear away carton. Wrap it with plastic, and let cure for several weeks. 
Milk-Carton Hypertufas: Milk cartons used as molds create cube-shaped hypertufa vessels, each sized for a single succulent. The tint variations are achieved by mixing in masonry stains. Directions Mix 3 quarts peat moss, 3 quarts perlite, and 3 quarts portland cement. Mix in 13 1/2 tablespoons masonry stain (1 1/2 tablespoons per quart). Add water until mixture has the consistency of cottage cheese. Makes 3 to 4 small boxes (4-inch cubes or 4 by 4 by 5 inches). Set Time and Release Let set for 24 hours, then gently remove interior container. Drill drainage holes with a masonry bit. After another 24 hours, tear away carton. Cover with plastic and cure for several weeks. 
Bowl Hypertufas: These rounded pots owe their smooth, elegant forms to a kitchen workhorse: the metal mixing bowl, in two sizes. Masonry stain added to the basic hypertufa formula imparts a cool blue hue. Mixed groupings of dwarf plants -- confiers, ground covers, and hostas -- fill the hemispheres. Directions For a 6-by-11-inch bowl, mix 2 quarts peat moss, 2 quarts perlite, and 2 quarts portland cement; for a 7-by-14-inch one, use 3 quarts of each. Mix in masonry stain (1 1/2 tablespoons per quart). Add water until mixture has the consistency of cottage cheese. Set Time and Release Let set for 36 hours, then gently remove interior container. After another 3 days, turn bowl over, and tap bottom with a rubber mallet to remove hypertufa. 

No comments:

Post a Comment

Gretchen's A to Z Bread

Makes 2 loaves

Mix together in a large mixing bowl:

3 eggs, 1⁄2 cup applesauce, 1⁄2 cup oil, 1 to 1 1⁄2 cup sugar (the original recipe calls for two cups; I have used 1 c sugar, or 1 c brown sugar, or 3⁄4 cup honey)

Add to bowl and mix in:

1⁄2 tsp baking powder, 1 tsp salt, 1 tsp baking soda, 3 tsp cinnamon, 3 tsp vanilla

Add in:

3 cups flour, 1 cup nuts (optional), and 2 cups A to Z (I have used chopped apples, mashed bananas, shredded carrots, pumpkin, mashed persimmons, and zucchini – you can use all of one or mix them)

Bake in two prepared loaf pans at 350 degrees for about 55 minutes, until done.


You can check out Gretchen's OTHER delicious Zucchinni recipes as, she so well put, life was giving her zucchini.....Chocolate Zucchini Muffins, Zucchini Pasta, Zucchini Walnut Cake, Zucchini Pickles, etc. on her blog at Pappasfam.blogspot.com

Back Yard Salad Garden

Back Yard Salad Garden

Turn A Salad Into Nutrition!

Grow fall & winter salad greens right outside your own kitchen door in containers for nutritious additions to salads when picked young.
Try.... different chards, kale, mustard greens, turnip greens, bok choy, collard greens, beet greens, arugula, broccolli raab or rapini, and then different types of lettuce.

Top it with calendula petals and violets and it's as pretty as it is delicious!